Contents
At first you must be wondering what the rubbish topic it is!
Why i need to learn how to tie a rope knot?
I already know that!
Right?
But my friend, i promise you will be thinking just opposite to it at the end of this article.
Either you are sailing or camping, these tricks are going to excel in each and every situation for sure.
If you need to lash something up, tie a rope to the tree or bind the two ropes of different thickness together, this how to tie a rope knot that won’t slip does it all.
Imagine you are camping and you have to protect your food from animals, simply hang over your food to the tree that is not accessible by them and the knot is in such a way that it does not tie off too not even by the strong winds.
Now it is the time to reveal back the list of rope knot tie that can help you to survive from a lot of tricky situations.
Without wasting much time, let’s get started:
Give It A Read: 500+ List Of Cool Clan Names
✔ 21 Best Rope Knot Method’s
1. The Square Knot (Reef Knot)
Why we need to use this knot?
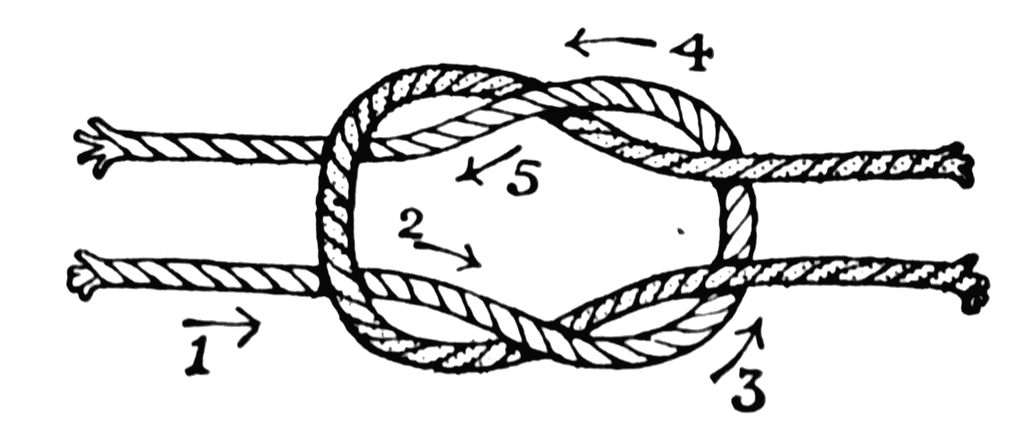
The square knot is the most common knot tie to be used on. If you wish to learn the easiest one, you should go for this only. This can be used to just combine two ropes of different kind or just tie the knot on the rope.
It is used in shoe string, gifts, bind packages, firewood, bolts, to close triangular bandage in first aid etc and even much more.
How can i tie it:
The simplest way to tie a adjustable knot on the rope is right over left and then just the opposite of it, that is left over right as illustrated in the figure but always take care of one thing that it should be done in a proper manner so that it could be untied easily if required.
2. Sheet Bend
Why we need to use this knot?
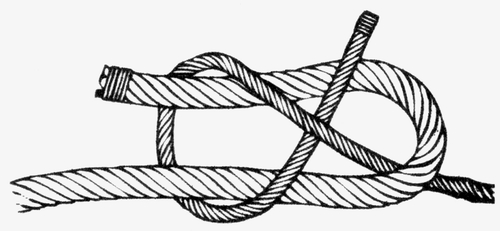
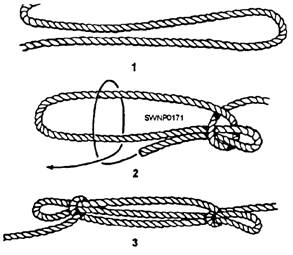
It is somewhat different from the first one as in this we can tie the knot on the rope without letting go by using two ropes of different thickness as well as different types that are of different materials.
How can i tie it:
First take the longer rope from the two and then make J shape out of it. Then from behind, pass the smaller rope through the middle.
To Know more, Watch it now!
After it, around both of the sides of shape J let it go all the way and then pass the smaller rope back underneath of itself as show in the above figure.
Also Read: How To Use iMessage On PC, Windows Or MAC
3. The Clove Hitch
Why we need to use this knot?
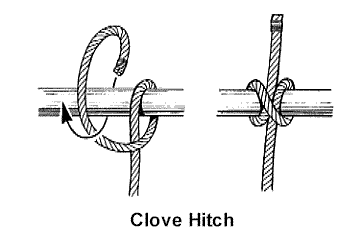
The clove hitch knot is the best way to tie the two ropes knot without letting go of the ends. This knot is fast, effective as well as easy to use.
It is mainly used to secure a knot to the solid structure and bind it quickly.
How can i tie it:
The first thing you need to do is first make a loop like structure around the rope and as similar to it, make a another loop. then before tightening it, pass the end of the rope under the loop.
You can add one more square knot as for the security as per your need.
4. The Figure 8
Why we need to use this knot?
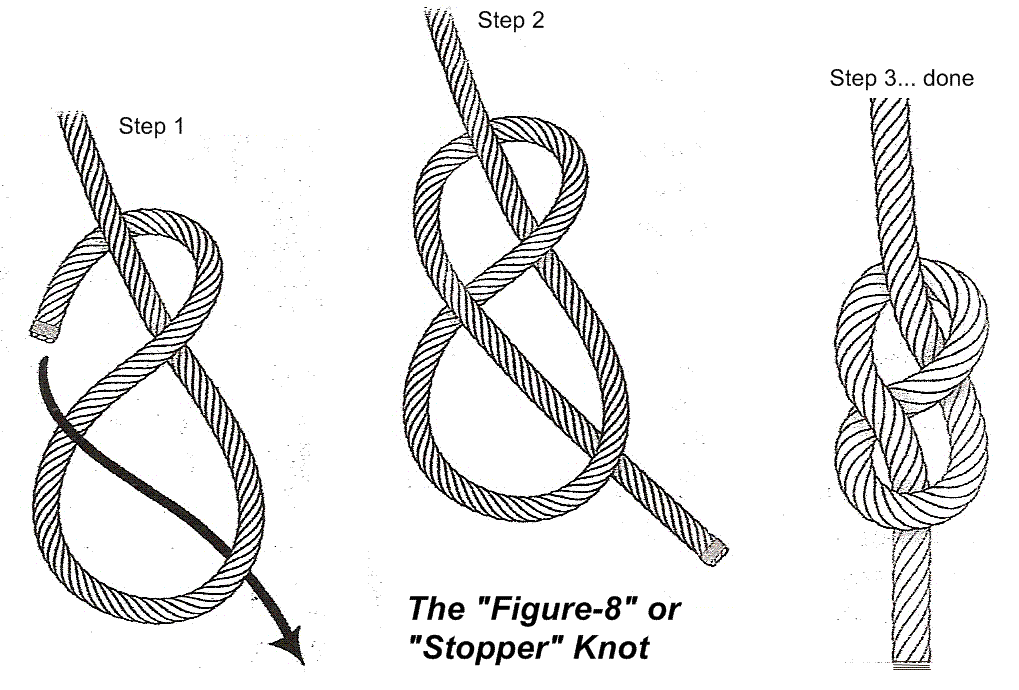
The Figure 8 knot, also known as Flemish Knot is best to know how to tie a non slip knot in a rope and allows us to tie various other complex knots.
How can i tie it:
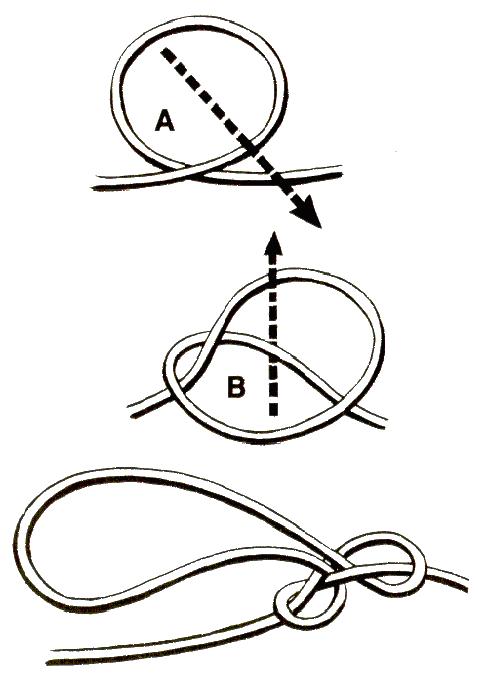
First form a loop and then easily pass the free end of a line over itself. After it, again go back and repeat the same under the main line through the first loop.
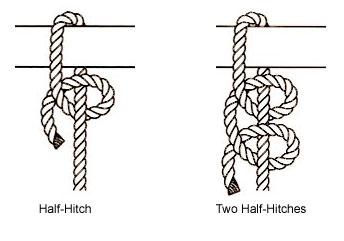
5. Two Half Hitches
Why we need to use this knot?
Two Half Hitches is, one of the way to tie a cool rope knot is always a one step above in comparison to the clove hitch knot and can secure the line to pole, trees or any other solid structure.
Even it can be used to tie tarps up for shelters and can be used to hang up hammocks.
How can i tie it:
This tie knot is pretty easy to learn. you just need to make a half hitch by wrapping around it’s one end to the structure of your choice and make another half hitch by wrapping the line in the same direction as showed in figure.
Pull it to make it tighter and that’s all, you are good to go!
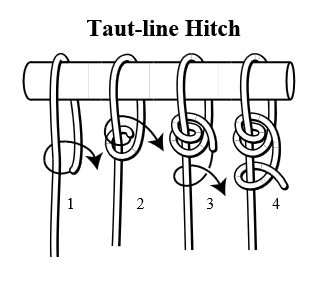
6. The Taut Line Hitch
Why we need to use this knot?
The Taut Line Hitch is known for it’s extra ordinary grip capabilities and the holding capabilities that it uses to tighten up an object.
How can i tie it:
Choose an object of your choice that you need to tie and create a loop n the rope and wrap around it. Around the line, Wrap the rope twice by its end back over the loop and back though.
To keep it tight, pull it strongly onto the object. You can add a additional square knot to make it more tighten as it’s get loosen up often.
7. The Rolling Hitch
Why we need to use this knot?
This is basically the knot behind the Taut Line Hitch knot discussed previously.
Along with the addition to any of the existing line, it can be used to hook dogs to a dog sled main line.
How can i tie it:
Take the free end of one rope of this double tie rope knot and form a half hitch. Then, again make a second half hitch and wrap around the entire third half hitch that will end in the opposite side of the starting end.
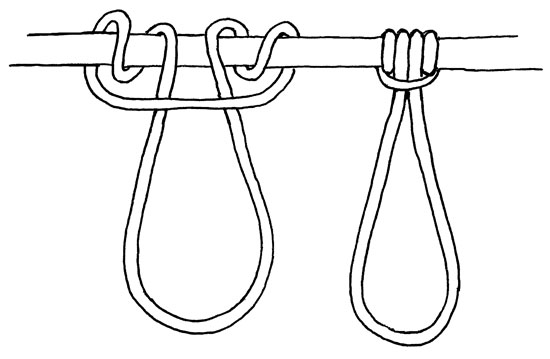
8. The Prusik Knot
Why we need to use this knot?
This anchor tie rope knot attaches to another rope by creating a loop. The created loop act as a joining point when none of the end is free.
The Prusik knot tightens when tension is added and slides in absence of any weight or tension, means it completely act as a ascend as well as descend.
How can i tie it:
A short length of line is enough to act as a joining point, no need of long rope in it. Like the previous knot discussed, it also tie a rope end knot as it’s line is used to attach a pre-existing rope.
First tie a square knot at the joining line and then for three times, wrap the rope around the pre-existing line.
One thing you should take care that it should lie flat against the rope. Lastly, pass the know through itself as shown in the figure and tighten it.
Must Read: Live Reacting Review: Create Pre-Recorded Videos & Live Games
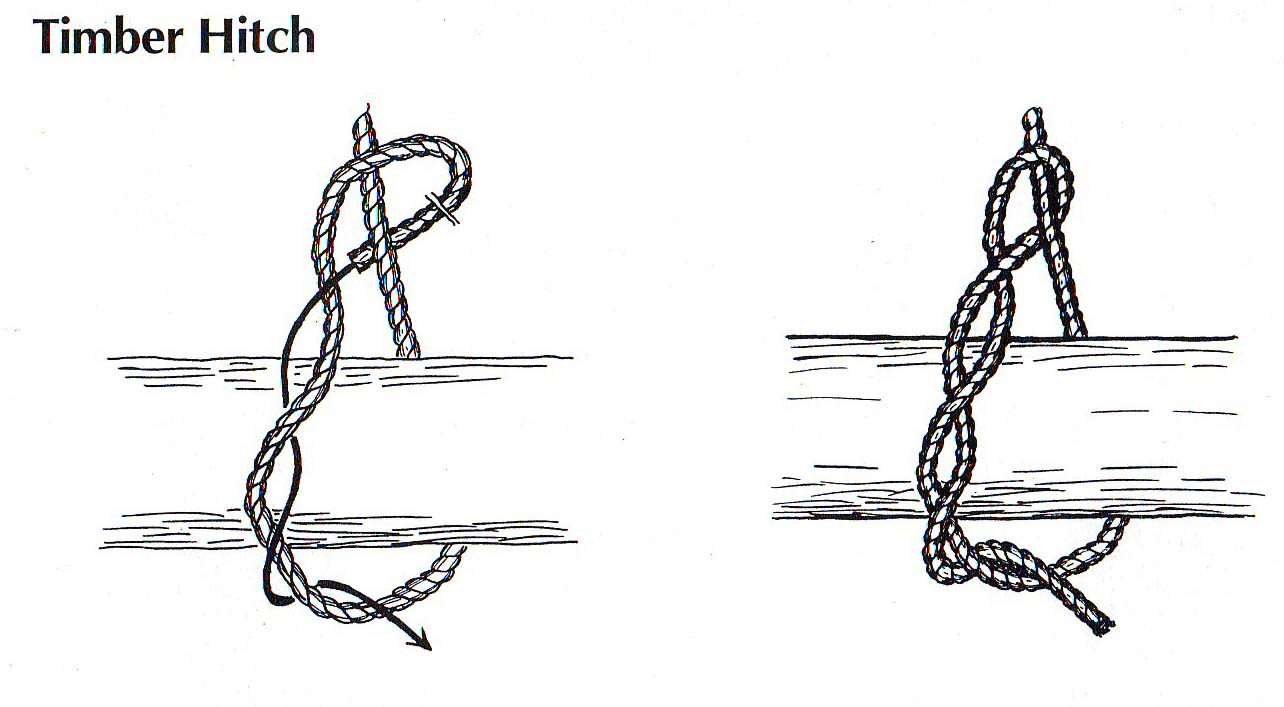
9. The Timber Hitch
Why we need to use this knot?
The timber hitch is one of the best quick tie knot that allows to move timber without any difficulty through the woods and helps in building building stands or blinds while clearing the paths too.
How can i tie it:
This knot is very simple to learn. just wrap the end of the line around the substance, take wood you need to pull and then the other side of the line is wrapped around the loop and that’s all, just pull it tight to keep it tighten just like fishermen’s knot.
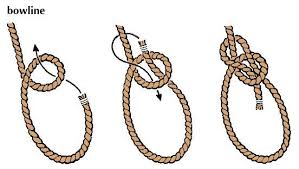
10. The Bowline
Why we need to use this knot?
The best part of The Bowline is it is used to tie a rope knot that does not get loosen up. It remains the same size once as created in the loop at the end side of the line.
How can i tie it:
First you need to make a loop at the end of the line and then the loop is wrapped against the tree and the loop will go back in itself.
Give It A Look: InterServer Review: Should You Buy Hosting?
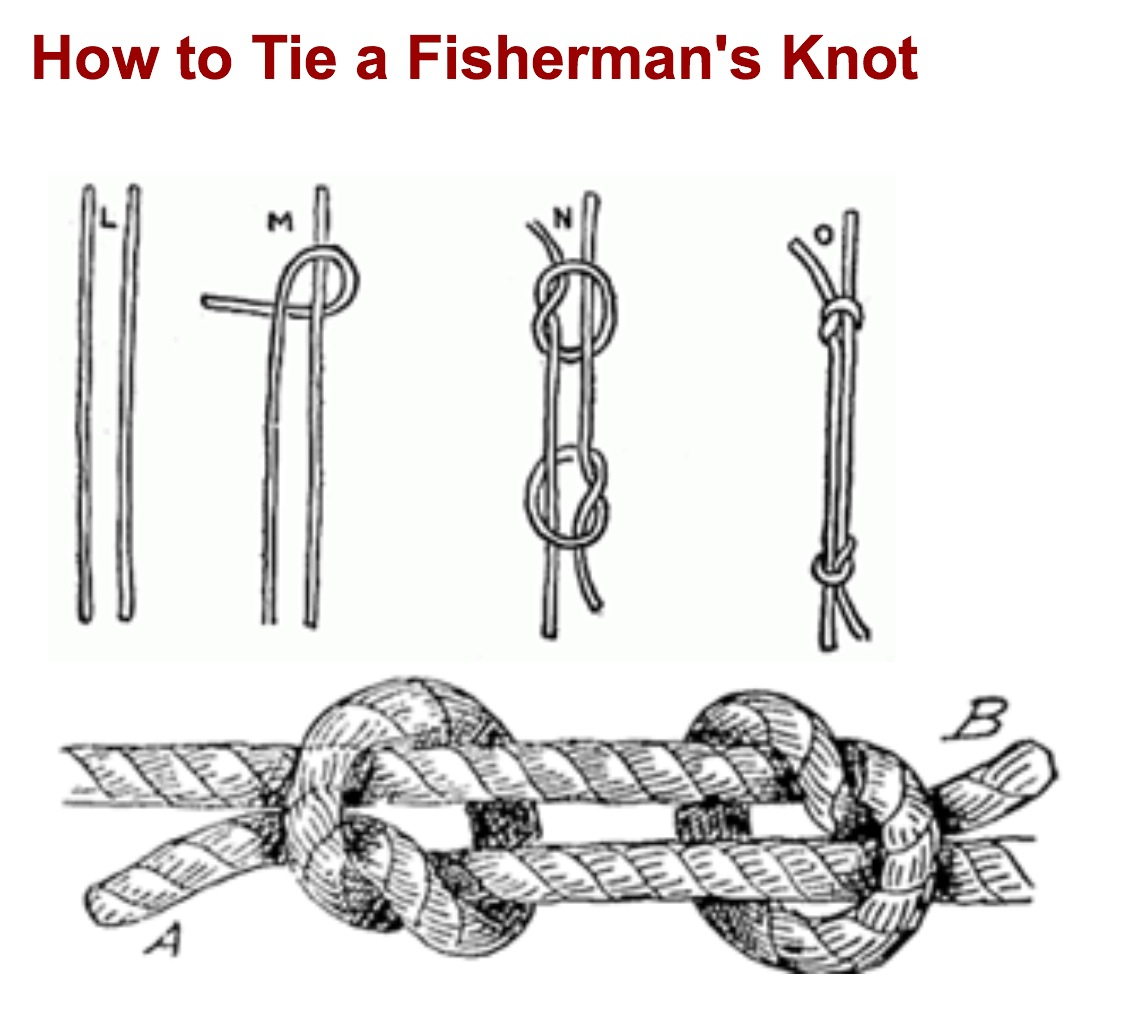
11. Fisherman’s Knot
Why we need to use this knot?
Fisherman’s Knot as name suggested is large tie rope knot that is used for fishing purposes.
How can i tie it:
Wrap the end of the rope around the object you want to and then wrap the rope to the other side for about five or six times.
After that, allow the end of the line to pass the opening that is triangular in shape next to the chosen object and then pass the line to the loop that you have created just now.
To prevent the friction that causes heat damage, spit on the rope to lubricate it before tightening.
Pull it, tighten it, remove any extra line if there and here you go to enjoy your all day fishing in a sunny day.
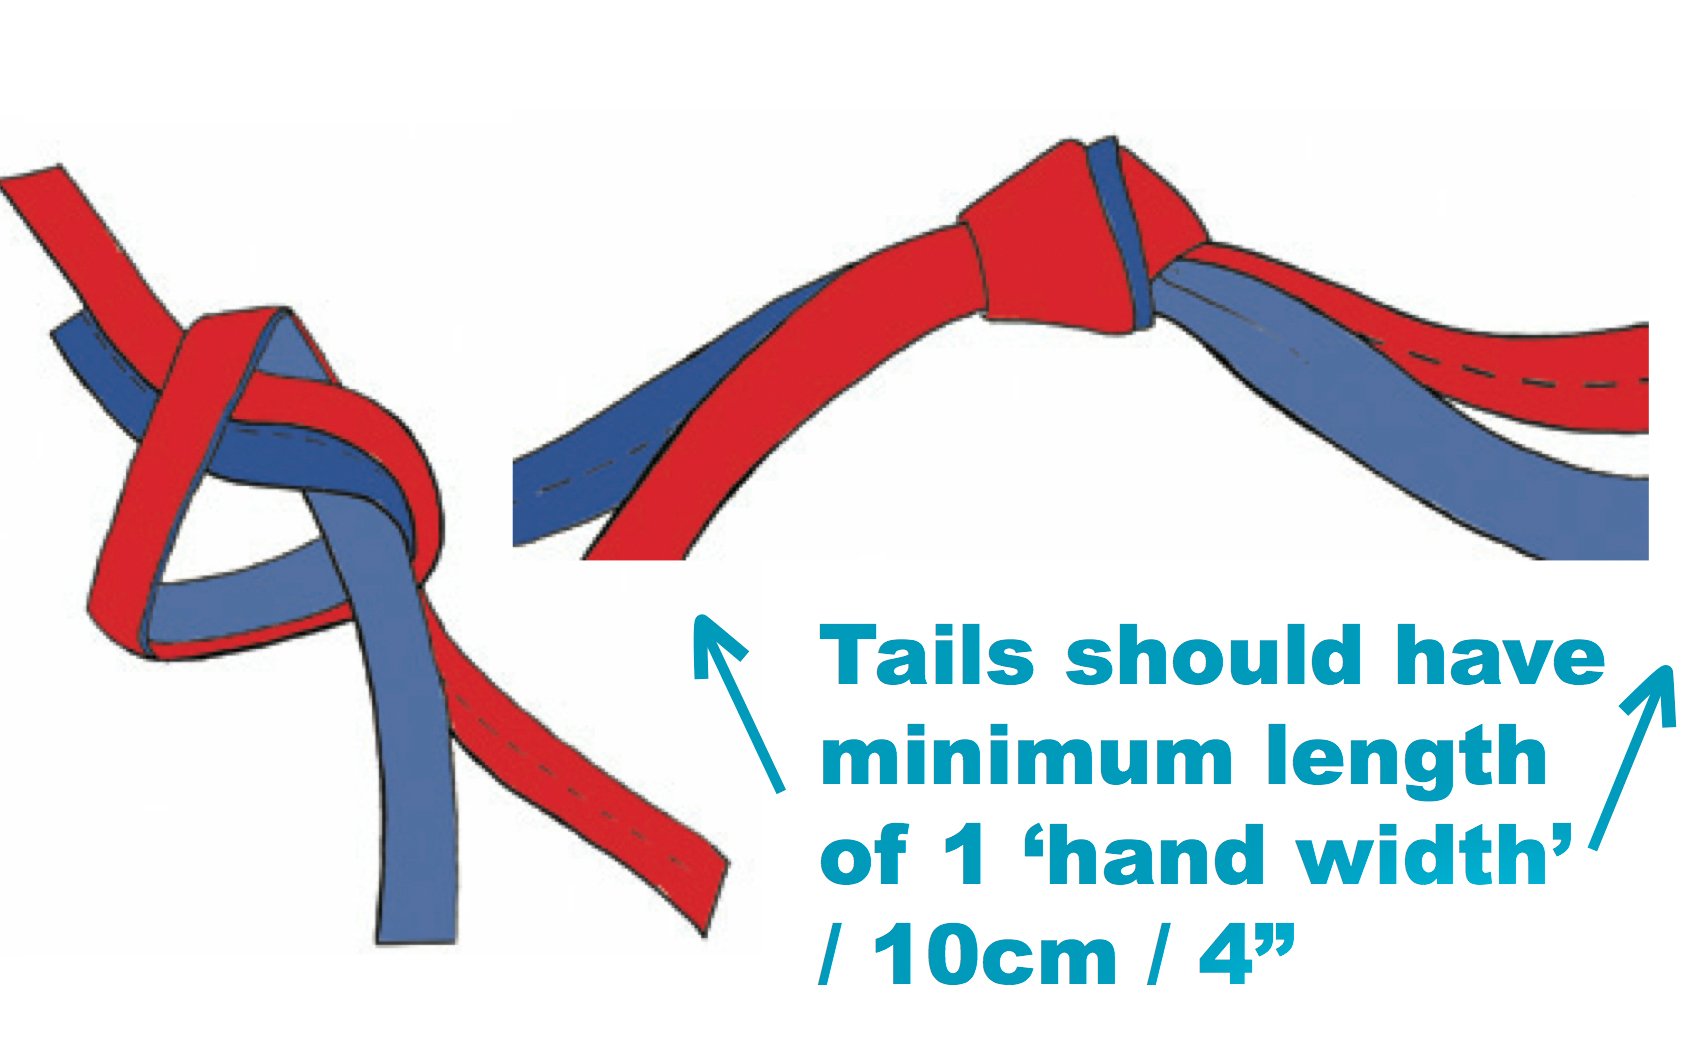
12. Water Knot
Why we need to use this knot?
This kind of knot is basically used in webbing, belts and straps.
How can i tie it:
Thinking about how to tie a rope as water knot?First take two straps.
Then tie a loose knot at the end of the one strap taken. Then, take the other one and pass it in opposite direction just as the same way like the first overhead knot.
Now as you have the both straps now, pull them tight.
Have A Look: Best Dremel 4000 vs 3000
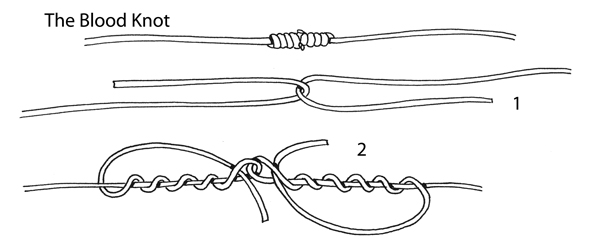
13. Blood Knot
Why we need to use this knot?
Tie a secure knot with rope using this Blood Knot which is the basic knot behind a fishing line.
it can be extended to any of the existing line easily and was used basically to secure two lines together.
How can i tie it:
Blood knot means the overlapping of the two ropes. one free end is wrapped over the another for a number of times, for around five to six times.
pass the free end between the two lines and again wrap the other line with a number of times again, say five or six and in the opposite direction of the other rope, tuck the line between the lines.
Due to friction it generates heat, so spit on it to reduce the friction.
14. Man Harness
Why we need to use this knot?
This creative tie knot on a rope does not put the loop at any of the free ends of the lines to make a loop.
It is awesome to cheat in tug of war to create man harness.
How can i tie it:
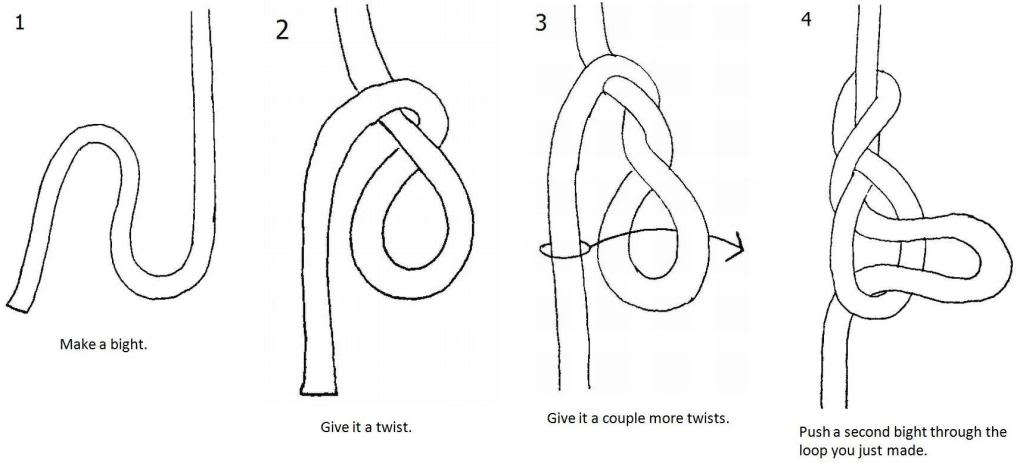
Make a loop in such a manner that part of the taken rope should run through the middle of the loop.
Now take the side of the loop formed and pull it through the middle and the other side gap formed in the rope.
For clinching the Man harness knot, tightly pull the new loop and then also pull the rope with it.
Always put some tension on the newly formed loop, if you do not do so, it may slip.
Jump onto: Wondershare Fotophire Photo Editing Software
15. Carrick Bend
Why we need to use this knot?
Try using tie different rope knots using the carrick bends that is a square knot that joins two different ropes and if you wish to untie it, you can also do that easily.
How can i tie it:
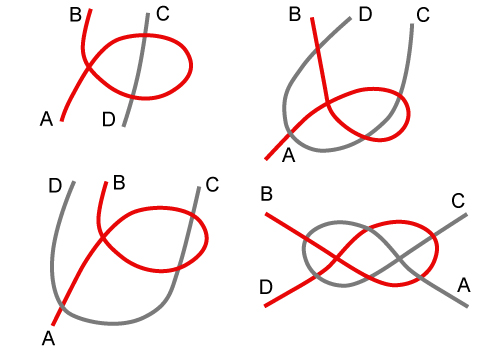
Take the free end of the one rope from the two and make a loop from it.
Then take the other free end of the other rope and allow it to pass through the loop of the first one again and again as shown in the above picture.
At last pull the ends of both the lines to tighten them.
16. Trucker’s Hitch
Why we need to use this knot?
Tie a rope loop knot using the Trucker’s hitch methodology that are unique in tying down tarps and shifting loads.
Although it’s a bit complex but it is good to tighten up rather than facing problems later.
How can i tie it:
It will be much easier to learn if you already know how to tie a knot using figure8, but if you don’t then we are here to teach you.
We have already discussed about the figure8, go through it and when you are well known to it then first make a figure8.
Then wrap around the free end of the rope to the object you want to secure and only then pass the rope through the loop.
pull the end tightly and secure the free end with the two half hitches formed that are at below the loop.
Give It A Look: OSI Affiliate Software Review
17. Barrel Hitch
Why we need to use this knot?
It is a method to tie a tight knot in the rope that is used in securing barrel, bucket or any other cylindrical objects of your choice.
In short it is used in sailing and construction work.
How can i tie it:
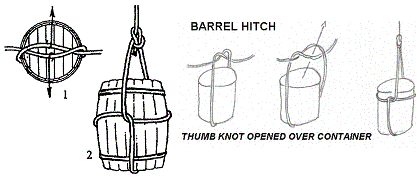
Choose a cylindrical object of your choice an put it on the rope. Then secure a knot on the top of the chosen object.
Keep opening it until it covers the top sides of the object. using the square knot, just tie the ends and lift it up.
This knot make it secure and act as a bucket handle with no breakage problem.
One important thing you need to note for the safety and stability is that always keep the line around the object high above the center of gravity on the cylindrical object.
18. Sheepshank
Why we need to use this knot?
In this how to tie rope knot guide, you may find Sheepshank as one of those tie knots that seems to be magical or some practical to some people.
The interesting thing in it shortens the rope even without cutting it from either sides. you can use it in bear bags as you do not wish to cut the line.
How can i tie it:
First decide the length you want and then fold the rope accordingly in this sheepshank tie knot method. Then, at the one end you need to create a half hitch and after creating it, you have to drop it down to the nearly loop
Then again create a half hitch on the other end and drop it at it’s adjacent loop. After doing so, tighten all the ends to secure it.
Must Read: Best Funny & Cool Friend Captions
19. Tripod Lashing
Why we need to use this knot?
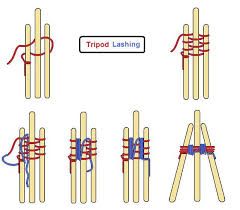
Tripod Lashing is one of the methodology to tie a rope knot shelter that works as square lashing.
How can i tie it:
Take your three poles that are lying one after another and then using clove hitch as mentioned, start tying it to one of the end poles and wrap around five to six times to all the poles.
Then wrap twice the rope in between each one ending back to the clove hitch. Now take the free end and tie it to the free end of the clove hitch.
Now it is ready to use in your campaign as just need the legs on the tripod and start using it.
20. The Improved Clinched Knot
Why we need to use this knot?
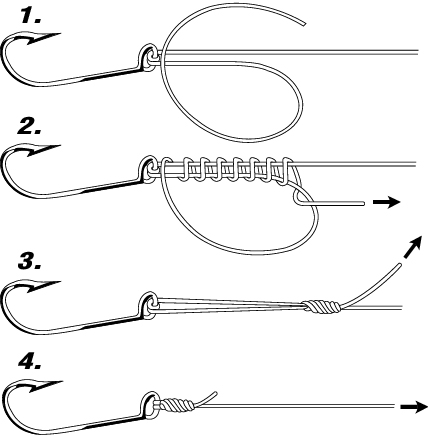
The Improved Clinched Knot is one of the answer to the questions like how to tie a fishing robe knot that is also used in securing lures, hooks and swivels in the rope.
How can i tie it:
Through eye of the hook, thread the rope and wrap five to six times around it.
Then pull out the end of the rope from the loop then from behind the hook and lastly from the large loop.
Then slide it tight to secure the coil tightly.
21. Palomar Knot
Why we need to use this knot?
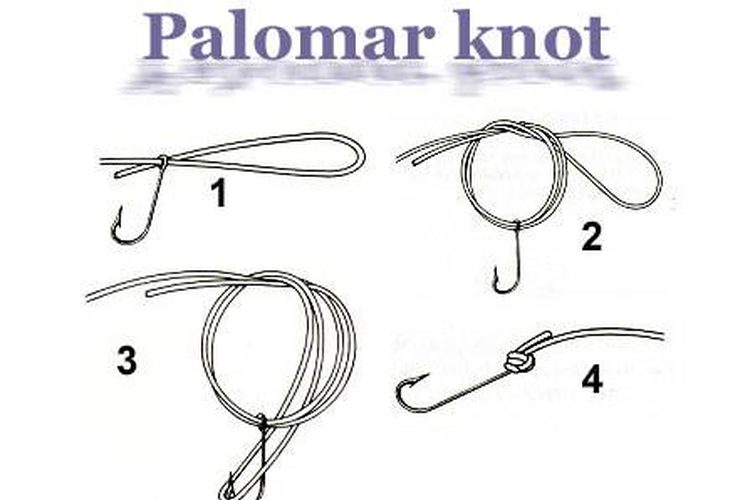
Tie this adjustable rope knot using the palomar knot that is used to secure hook to the fishing rope.
How can i tie it:
Pass the rope through the eye of the hook after doubling it to six inches. With the hook hanging from the bottom, tie a loose overhand knot.
Over the hook, pass the loop and then slide above eye of the hook.
Now pull both the ends to tighten it.
Must Read: How to Launch an Online Startup from Scratch
Now we are ready with some of the questions with their to the point answers that must be wondering in the corridor of your mind from all along the article.
It’s time to clear them out:
Q 1. Using which knot, i can tie something to the pole?
Ans: If you wish to tie something to the poles, go for Hitch Knots. We have already mentioned a few, check them out.
Q 2. I want to use tie rope knots for transportation. which one should i pick?
Ans: The truckers hitch would be best recommended if you are trying to lift bulky objects for the purpose of transportation.
Q 3. I want to learn the knots, which type of rope should i go for?
Ans: 3 to 7 mm utility cord is specially designed for tying. so according to me, you should opt this one.
Q 4. What should i choose? double half hitch or two half hitch?
Ans: The following points will clear out your doubts for sure:
- Two half hitches holds better under load in comparison of the double half-hitch
- The double half hitch slips more easily in comparison of the two half-hitches.
Now i think you can easily decide, what you should opt for.
Q 5. I want to tie a clothsline to a tree, which knot would be a good option to do so?
Ans: Tumble hitch would be my answer as it’s one need can carry the load while the another one can be used to untie it anytime.
Q 6. Which knot is preferred for ice axe leashes?
Ans: You can go for basic munter hitch for such preferences.
Q 7. What is the name of the knot that is difficult to untie under tension and tightens under pressure?
Ans: My best preference would be poachers knot as it suits the best for it.
Time To Wrap Up: How To Tie A Rope Knot
We kept our promised? isn’t we?
These were some of the tips and tricks behind how to tie a rope knot either for sailing, or for camping or anything you wish for.
These can save even your life too in difficult situations. Learn them as suggested in the article and be a master at it.



Do you have any instructions on how to tie a hangman’s knot?
Sure! We will write something on this topic.